1 pound ground beef
1 10 3/4 oz can tomato soup
1 can 16oz Chili
1 16 oz bag Fritos Chips
1 cup Cheddar Cheese Chips
Brown meat and simmer until done. Drain Grease. Add Soup and Chili.
Line casserole dish with 1/2 bag of fritos. Pour the meat mixture. Add the rest of the Fritos. Top with cheese. Bake at 400 for 15 minutes
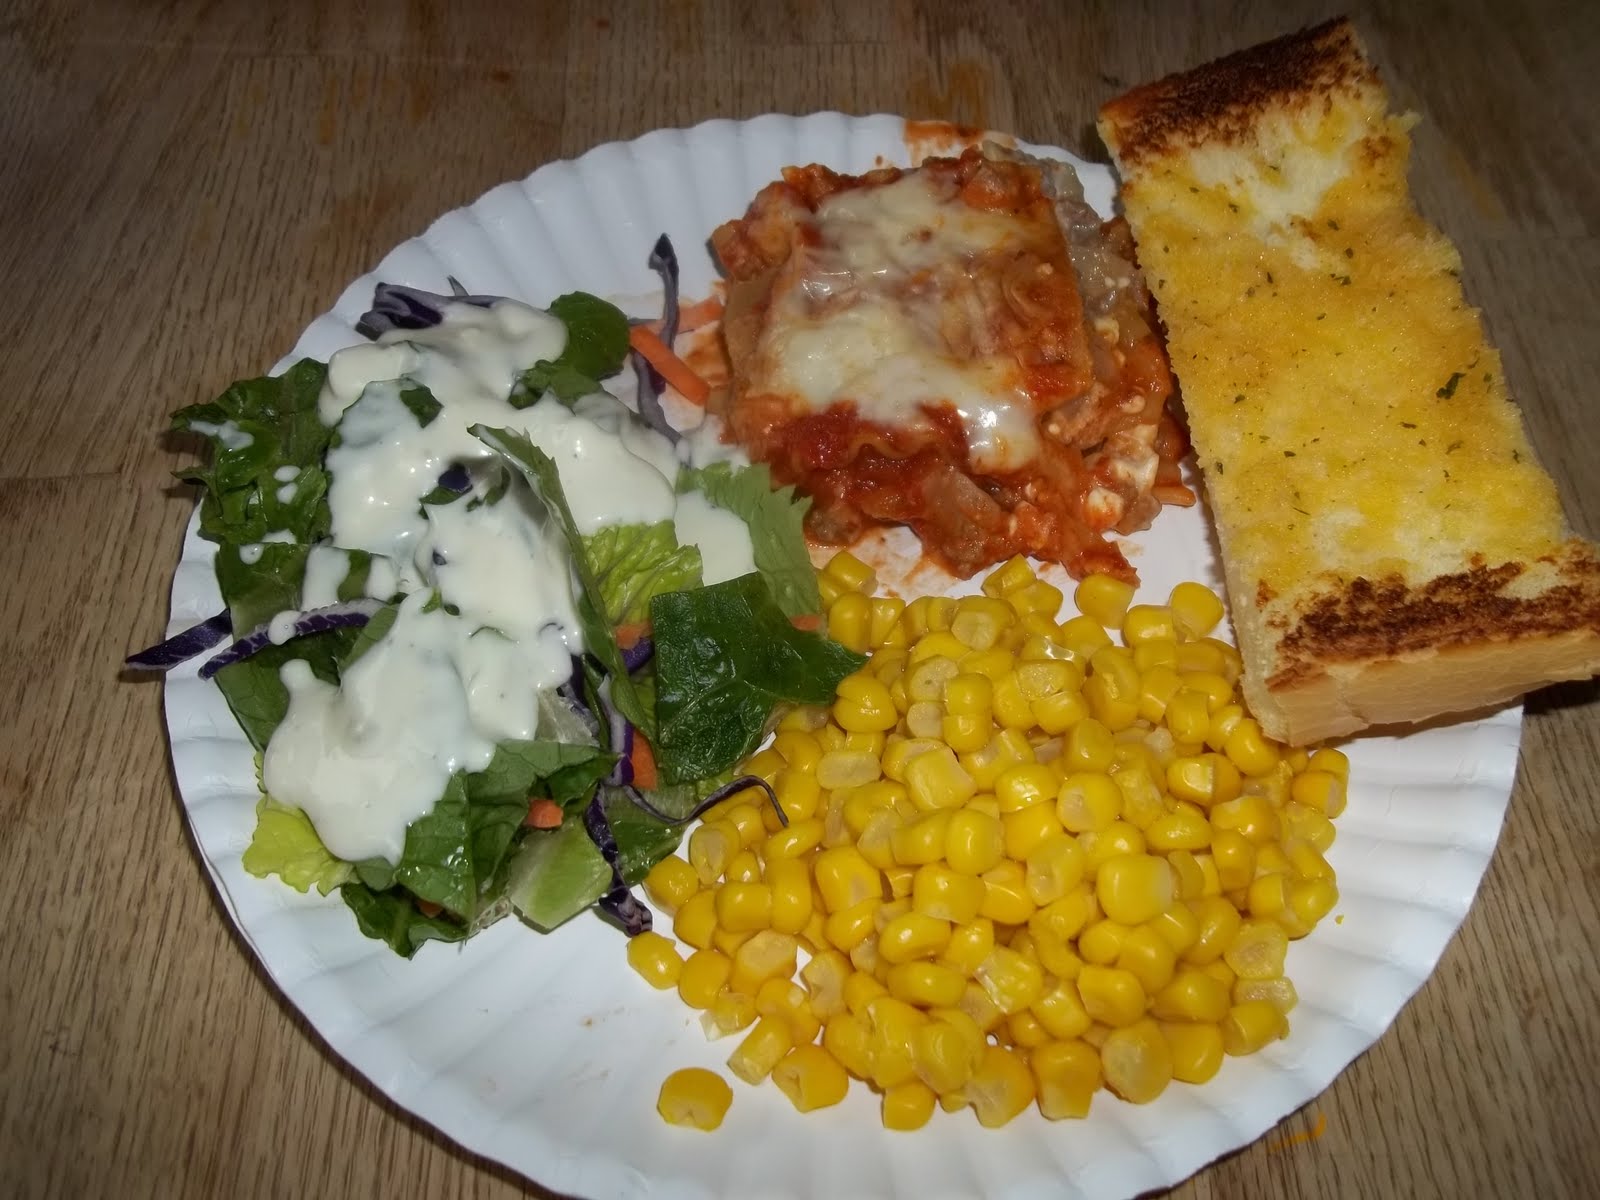
**Our kids begged for 2nds and 3rds of this yummy dinner!**
I served it with a bag of lettuce and ranch dressing!
Monday, September 19, 2011
Friday, September 9, 2011
Lasagna

1 lb hamb.
1/2 yellow onion, chopped
lasagna noodles
spaghetti sauce
cottage cheese
mozarella, grated
Brown hamb with onion. Drain and rinse.
Spread a little spaghetti sauce in the bottom a glass 9 X 13 pan. Put 3 uncooked noodles on the sauce. Cover noodles with a little sauce. Then half of the meat. some cottage cheese, some mozarella, noodles, sauce, meat, cottage cheese, cheese, noodles, sauce, cheese.
Bake covered with foil at 350 for about an hour to
an hour and a half (when you poke with a fork the noodles should be very soft and easy to poke through). Remove foil and bake for 10 more minutes. Remove from oven and let sit for 10 minutes before cutting.
Whole wheat noodles take longer. If you run out of sauce, use tomato sauc
Whole wheat noodles take longer. If you run out of sauce, use tomato sauc
e rather than open a whole new can of spaghetti sauce.

Friday, September 2, 2011
Banana Squash

Fresh Spaghetti Sauce

So even though our garden looks like the Garden of "WEED"en it really is producing vegetables. So yesterday I was feeling home-makerly and decided to make spaghetti sauce from fresh tomatoes. It turned out really good. Even Jason liked it, which is saying something!
It was from Food.com. (Fresh Tomato Spaghetti Sauce by Lauralie41)
Here is the original recipe and below is the way I made it (I didn't have all of the fresh hebs and onion, so I used dried).
http://www.food.com/recipe/fresh-tomato-spaghetti-sauce-10837
4 lbs. tomatoes, chopped and peeled
2 med onions
4 cloves garlic
1/4 C. fresh basil
1/4 C. olive oil
1 tsp. salt
4 sprigs parsley
1 T. sugar
Directions:
- 1To cook pasta sauce, heat olive oil over medium heat in a large iron skillet or heavy saucepan.
- 2Add onion, basil, garlic and salt.
- 3Saute until onion is tender, approximately 5 minutes.
- 4Add tomato, parsley and sugar; heat to a boil; reduce heat and simmer, uncovered for about 2 hours, stirring often or until sauce has thickened.
- 5Remove parsley.
- 6Serve over cooked spaghetti or other Italian pasta and top with Parmesan cheese.
HERE'S WHAT I DID...4 lbs tomatoes2 T. dried onions2 tsp. minced garlic (from a bottle)4 tsp fresh basil1/4 C. canola (I didn't have olive oil)1 tsp. salt4 tsp. parsley1 T. white granulated sugar
Boil a big pan of water. Put tomatoes in water until skin splits open. Remove tomatoes from water, put in cold water. Skin will just fall right off the tomatoes. Core tomatoes.
Then I put the tomatoes in the blender (because I don't like chunks). Pour tomatoe puree in a pan. Add spices. Bring to a boil, then simmer for 2 hours. Let cool. Reheat and serve over noodles.
I did have to add some water at the end because it was too thick for me. I also added a lb of cooked hamburger. I think it would have been good without. Or with sausage.
It was good, I would make it again. A little labor intensive, not too bad. And you did have to start 3 or 4 hours ahead of when you wanted to eat.
We also had fresh cucumbers and squash and cooked carrots from the garden (the carrots are not pictures because they weren't quite done cooking when we sat down to eat!) I felt very self-reliant that night! It's a good feeling!


Thursday, September 1, 2011
Pretzels
On the top of the incredibly long list of food that my almost 4 year old son won't eat is bread. He refuses any type of sandwich. I've found a couple of loopholes, though, in the form of cinnamon rolls (minus the frosting, of course, because it's too "messy" for him) and pretzels. Rather than run to Sam's Club every time he wants a pretzel, I decided to try making them at home. A couple of hit and miss tries later, and I've got a great (and EASY!) recipe for you!
Homemade Pretzels
4 teaspoons active dry yeast
1 tsp. white sugar
1 1/4 cups warm water (about 110 degrees F)
5 cups all-purpose flour
1/2 C white sugar
1 1/2 tsp salt
1 TBSP vegetable oil
1/2 C baking soda
4 cups hot water
Kosher salt, for topping
In a small bowl, dissolve the yeast and 1 tsp sugar in the warm water. Let that sit about ten minutes--until creamy.
In a large bowl, mix together the flour, remaining sugar, and salt. Make a well in the center, then add the oil and yeast mixture. Mix and form into a dough. If it's too dry, add water one TBSP at a time. Knead the dough until smooth--about 7 to 8 minutes.
(Or, if you're lazy like me, 2 minutes works, too.)
Lightly oil a large bowl, put the dough in the bowl and turn to coat with oil. Cover with a warm, damp cloth and let rise in a warm place for about an hour (until it has doubled in size).
Preheat oven to 450 degrees. In a large bowl, dissolve the baking soda in the hot water. Turn dough out onto a lightly floured surface (or just punch it down in the bowl...) and divide into 12 equal parts. Roll each piece into a long snake-rope and twist into pretzel shape. (This is easiest by making a U, then taking the top edges and twisting them a couple of times, then fold down to make the pretzel.)
Once the dough is all shaped, dip each one into the baking soda solution and place on a greased cookie sheet. Sprinkle with Kosher salt (if you don't have it, I've used regular and they still turn out fine--they just don't taste quite as "pretzel-y").
Bake for about 8 minutes, until browned.
*Okay, some notes from experience: You are supposed to roll the dough out until it's "pencil thin." Trust me, though, your arms get really tired after a couple of these puppies, so if your pretzels end up being smaller and thicker (like mine), turn the oven down to 400 degrees otherwise they will be REALLY doughy, but burnt on the outside. Also, in case you're wondering, the point of the baking soda bath is to make them taste like pretzels instead of salty bread. And lastly, you can skip the Kosher salt step and instead, when they come out of the oven, spread melted butter on them and sprinkle with cinnamon sugar. Delicious either way!
(Sorry about lack of pictures! My family and I eat these way too fast and I realized I needed a picture a little too late.)
Wednesday, August 24, 2011
Hot Cocoa Mix
I got this recipe from a college room-mates grandma. The grandma would send a cannery can full of the mix with her grand-daughter (my room-mate). I remember it being super yummy, although I haven't made it myself. Cocoa doesn't sound all that pleasant in this weather. But I intend to this winter.
14 qt. powdered milk
1 large can Nestle Quick
1 lb powdered sugar
1 medium jar coffee mate
Mix well.
To make cocoa...1/3 C. mix to 1 C. hot water
I'll let you know how it turns out!
14 qt. powdered milk
1 large can Nestle Quick
1 lb powdered sugar
1 medium jar coffee mate
Mix well.
To make cocoa...1/3 C. mix to 1 C. hot water
I'll let you know how it turns out!
Philly 3 step No-bake Cheesecake
I fell in love with this recipe while I was in college and I still make it today. It was off the back of a cream cheese container. (Hence the reference to "philly" for Philadelphia cream cheese). It is not like cheesecake from the cheesecake factory (it is not baked) so don't expect that. But I think it's a fast yummy dessert.
Prep time: 10 Min
Baking time: none
Refrigeration time: a few hours
Serves: 8
1 (8 oz) cream cheese, softened
1/2 C. white granulated sugar
2 C. thawed cool whip
1 graham cracker crust (or make your own by crushing graham cracker, placing in bottom of pie tin and drizzling with melted better or margarine and baking for a bit)
1 can (20 oz) cherry pie filling (or I like raspberry---just personal preference)
Mix cream cheese and sugar. Stir in cool whip. Spoon into crust. Top with pie filling. Refrigerate until ready to serve. (probably want to give it an hour or two in the fridge before serving).
Homemade Icecream and Icecream maker
You can ignore the second video...it is basically the same...it won't let me delete it!!!?!?!!!?!!!
I have a cuisinart electric icecream maker. I love it. It makes 2 qts of homemade icecream in 25 minutes. You can start it when you sit down to eat and you have fresh icecream when you are done eating dinner. Or make a fast FHE treat.
Here are the advantages to the kind I use
Fast
Easy
No rock salt required
No ice required
The ice and bowl don't get stuck
Quiet
Here are the disadvantages to the kind I use
Smaller than traditional (still big enough to feed my family of 6 and have leftover)
Have to think ahead and freeze container (I just keep it in the freezer so it's ready to go)
Here are the different parts to it.


 The bowl that you pour the icecream mixture into. You freeze it for 24 hours before making icecream. This is the part of the contraption that turns.


I can't find the main vanilla recipe I like. I'll have to keep searching or resort to calling my Mom.
This one is good with fruit (this is for my 2 qt icecream maker---a traditional icecream maker would be double this amount).
1 pt. whipping cream
1 can (soup can size) evaporated milk
1 &1/2 C. white granulated sugar
1 T. vanilla
1 T. lemon juice
pinch of salt
1 C. fruit of any kind (optional) (chopped or pureed)
Mix all ingredients (except fruit) in a jar with lid (shake it up). Pour into icecream maker. Add fruit the last few minutes or it will be frozen chunks.
My Mom always said not to use icecream recipes with raw eggs (which this one DOES NOT have) just as a warning.
I have a cuisinart electric icecream maker. I love it. It makes 2 qts of homemade icecream in 25 minutes. You can start it when you sit down to eat and you have fresh icecream when you are done eating dinner. Or make a fast FHE treat.
Here are the advantages to the kind I use
Fast
Easy
No rock salt required
No ice required
The ice and bowl don't get stuck
Quiet
Here are the disadvantages to the kind I use
Smaller than traditional (still big enough to feed my family of 6 and have leftover)
Have to think ahead and freeze container (I just keep it in the freezer so it's ready to go)
Here are the different parts to it.

This is the base and the cord is stored in the bottom.


The beater that mixes the icecream while it's freezing. The beater does not move while mixing (the bowl does).

The lid. The lid does not move while mixing/freezing.


The bowl sits in the base.

All put together.

Completed Ice cream!!! Yummmmm!!
I can't find the main vanilla recipe I like. I'll have to keep searching or resort to calling my Mom.
This one is good with fruit (this is for my 2 qt icecream maker---a traditional icecream maker would be double this amount).
1 pt. whipping cream
1 can (soup can size) evaporated milk
1 &1/2 C. white granulated sugar
1 T. vanilla
1 T. lemon juice
pinch of salt
1 C. fruit of any kind (optional) (chopped or pureed)
Mix all ingredients (except fruit) in a jar with lid (shake it up). Pour into icecream maker. Add fruit the last few minutes or it will be frozen chunks.
My Mom always said not to use icecream recipes with raw eggs (which this one DOES NOT have) just as a warning.
Quick Chili
Here is a recipe I made up.
1 can pinto beans, rinsed and drained
1 can black beans, rinsed and drained
1 can kidney beans, rinsed and drained
1 qt. bottled tomatoes, pureed in blender
1 lb. cooked hamburger
2 pkgs taco seasoning
a little chili pwd
liquid smoke, original flavor (by spices)
pepper
garlic powder
Warm to boiling, allow to cool slightly before serving.
Here is an alternate I made last night
1 can pinto beans, rinsed and drained
1 can kidney beans, rinsed and drained
1 qt. bottled tomatoes, pureed in blender
1/2 lb leftover taco meat
1 pkg chili seasoning (mine was McCormick)
liquid smoke, original flavor (3 shakes)
3-5 shakes garlic powder
3-5 shakes onion powder
It needed pepper.
It really isn't as hard as I used to think. It is really fast. Almost as fast as warming up a can of chili (if hamburger is already cooked) and waaaaay better. Just keep tossing in seasonings that go with chili until the sauce tastes good!

1 can pinto beans, rinsed and drained
1 can black beans, rinsed and drained
1 can kidney beans, rinsed and drained
1 qt. bottled tomatoes, pureed in blender
1 lb. cooked hamburger
2 pkgs taco seasoning
a little chili pwd
liquid smoke, original flavor (by spices)
pepper
garlic powder
Warm to boiling, allow to cool slightly before serving.
Here is an alternate I made last night
1 can pinto beans, rinsed and drained
1 can kidney beans, rinsed and drained
1 qt. bottled tomatoes, pureed in blender
1/2 lb leftover taco meat
1 pkg chili seasoning (mine was McCormick)
liquid smoke, original flavor (3 shakes)
3-5 shakes garlic powder
3-5 shakes onion powder
It needed pepper.
It really isn't as hard as I used to think. It is really fast. Almost as fast as warming up a can of chili (if hamburger is already cooked) and waaaaay better. Just keep tossing in seasonings that go with chili until the sauce tastes good!

Monday, August 22, 2011
Easy Icecream (Sherbet style)
This is a fun icecream recipe to make.
2 liter bottle of pop (cold) ---minus 1 C.
1 can sweetened condensed milk
Mix together and freze in icecream maker or the tin can way that you roll.
It is pretty runny...but really good!
2 liter bottle of pop (cold) ---minus 1 C.
1 can sweetened condensed milk
Mix together and freze in icecream maker or the tin can way that you roll.
It is pretty runny...but really good!
We need more recipes!
Life has been busy...so I haven't been posting myself.
We have 9 authors now! Anyone who is currently or previously has been in our ward is welcome to be an author! Just send mstans an email. (Ask around at church if you don't know my email).
Please keep (or start) posting. Your recipes are great. We want to hear from you!
If you have a cooking/recipe blog of your own. Let me know and I will post a link on the sidebar. Or if there is a blog (of someone else's) (cooking or recipe) that you like let me know too.
Keep up the good work.
Spread the word!
Also remember you can subscribe to the RSS feed or receive emails when anyone posts so you can keep up with all of the latest posts.
Wednesday, August 17, 2011
Crock Pot Chicken
The first six years of my marriage, I only used my crock pot once. The last six months, though, I've become a bit obsessed with it (1:00 church may have something to do with it...). My "go-to" dish is to throw in 3 pieces of chicken (you can do more, but that works for my little family), a can of cream of chicken soup, cubed red potatoes with the skin on (russet is fine, too), and carrots cut into bite size pieces. I throw the chicken in still frozen and let it all sit for about 7 hours. I've tried a new dish recently, though, and wanted to share it. It's been crazy popular over on Pinterest and it's called Hawaiian Barbeque Crock Pot Chicken. Here is the original link. Basically, you take 4-6 pieces of (frozen) chicken, an entire bottle of BBQ sauce, and a 20 oz can of pineapple chunks...throw it all in the beautiful crock pot and let it sit for 2-3 hours on high or 4-6 hours on low. Shred the chicken with two forks and stir it all up to get lots of saucy goodness, then serve over rice! It's SUPER easy and SO delicious!
 |
| I forgot to take a picture, so I stole this from the original blog where I got the recipe. :) Enjoy! |
Subscribe to:
Comments (Atom)